Hillshade lapak gis is a digital image processing technique used to render a three-dimensional (3D) surface of a two-dimensional (2D) map. The technique is used to highlight the relief of the terrain by creating a shaded relief map from a digital elevation model.
Introduction
Hillshade is a technique used in cartography to create a 3D effect on a 2D map. The hillshade technique is used to add a third dimension to a map by simulating the effects of shadows cast by terrain features.
Hillshades can be used to create both static and interactive maps. Static hillshades are often used in printed maps, while interactive hillshades are used in online mapping applications.
The hillshade technique is based on the fact that terrain features cast shadows. The amount of shadow cast by a feature depends on the angle of the sun and the elevation of the feature.
To create a hillshade, a mapmaker must first determine the angle of the sun and the elevation of the terrain features. The mapmaker then uses this information to create a grid of shadows.
The shadows are then added to the map, creating the illusion of a third dimension.
Hillshades can be used to create both static and interactive maps. Static hillshades are often used in printed maps, while interactive hillshades are used in online mapping applications.
Interactive hillshades allow users to control the angle of the sun, which can be used to create different effects. For example, users can use an interactive hillshade to see how the shadows change throughout the day.
Hillshades can also be used to create contour maps. Contour maps are two-dimensional maps that use lines to show changes in elevation. By combining a hillshade with a contour map, mapmakers can create a three-dimensional map that shows both the elevation and the shadows cast by the terrain features.
The hillshade technique is a simple way to add a third dimension to a map. By understanding the basics of how shadows are cast, mapmakers can create realistic and informative maps.
What is hillshade lapak gis?
Hillshade lapak gis is a type of mapping technique that allows you to create a three-dimensional representation of a terrain. This technique is often used in the field of cartography, as it can give a more accurate representation of a landscape than a traditional two-dimensional map.
To create a hillshade lapak gis, you will first need to create a digital elevation model (DEM). This can be done using a variety of methods, such as LiDAR surveys or GPS surveys. Once you have your DEM, you can then use a computer program to generate a three-dimensional representation of the terrain.
There are many uses for hillshade lapak gis. For example, they can be used to create virtual reality simulations of landscapes, or to help plan the construction of roads and other infrastructure projects.
If you are interested in learning more about hillshade lapak gis, there are a number of resources available online. You can also check with your local library or bookstore for books on the subject.
How is hillshade lapak gis created?
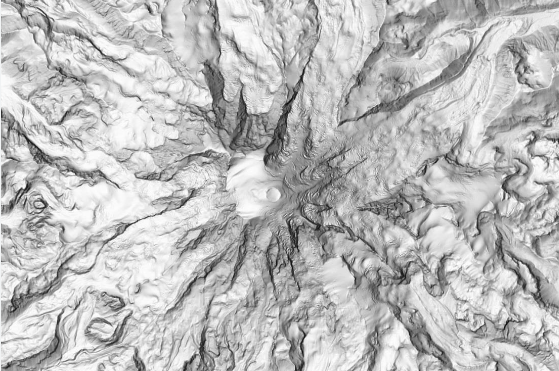
Hillshade lapak gis is a type of shaded relief map that shows the shape of the land surface in three dimensions. It is created by taking a digital elevation model (DEM) of the area and then using computer software to generate a three-dimensional representation of the terrain. The resulting image is then draped with a raster image of the land cover, such as a satellite image, to create a realistic view of the land surface.
How can hillshade lapak gis be used?
Hillshade is a popular technique in the GIS world for creating a three-dimensional effect from a two-dimensional elevation raster. Hillshade can be used to create a 3D map view, to add depth to line work, or to create an visually-appealing background for a map.
Lapak GIS is a powerful tool that can be used to create hillshades. Lapak GIS has a Hillshade function that allows you to create a hillshade from an elevation raster. The Hillshade function has many options that allow you to customize the hillshade to your liking.
The first step in creating a hillshade with Lapak GIS is to open the Hillshade function. To do this, go to the Analysis menu and click on the Hillshade function.
The next step is to select the input raster. This is the elevation raster that you want to create the hillshade from. You can either select a raster from the drop-down menu or click on the Browse button to select a raster from your computer.
After you have selected the input raster, you need to select an output raster. This is the raster that the hillshade will be saved to. You can either select a raster from the drop-down menu or click on the Browse button to select a raster from your computer.
The next step is to select the light source. The light source is the direction that the light is coming from. You can either select a direction from the drop-down menu or you can click on the arrow buttons to change the light source direction.
The next step is to select the z-factor. The z-factor is used to convert the elevation values to the correct units. If you are not sure what z-factor to use, you can leave the default z-factor of 1.
The next step is to select the height. The height is the height of the light source above the surface. The default height is 1.
The next step is to select the azimuth. The
Conclusion
Hillshade is a popular method of visualizing elevation data. It is often used in conjunction with other methods, such as contours, to create a more detailed and accurate picture of the land surface.
There are many factors that go into creating a good hillshade, including the angle of the sun, the aspect of the land, and the elevation of the land. The angle of the sun is important because it affects the shadows that are cast. The aspect of the land is important because it affects the amount of sunlight that hits the land. The elevation of the land is important because it affects the shadows that are cast.
There are many software programs that can create hillshades, but they all have their own algorithms and methods. Some programs are better than others, and some are more user-friendly than others. The best way to find the right program for you is to experiment with a few different ones and see which one you like the best.
Once you have a program that you like, you can use it to create a hillshade of any elevation data. This can be useful for a variety of purposes, such as planning a hike or understanding the lay of the land.